

Playlists
Overview
Playlists are essential organizational tools within Backstage that allow you to group related content for display across platforms. Whether you're curating collections for the homepage, organizing series episodes, or creating thematic content groupings, playlists provide the structure needed to deliver a cohesive viewing experience to users across mobile, tablet, and TV applications.
Backstage supports both Manual Playlists (where you individually select and order content) and Dynamic Playlists (which automatically populate based on tag filtering), giving you complete control over how your content is organized and presented to viewers.
Playlist Presets
Playlist Presets are predefined templates with customized fields specific to different types of content collections. Each preset is designed to capture the relevant information and organizational structure for that particular playlist type, making content management more efficient.
Example Playlist Presets:
Series: Used for organizing episodes of a show in sequential order
Manual Playlist: For hand-picked selections of content with custom ordering
Selecting the appropriate preset ensures that you'll have all the necessary fields to properly categorize and organize your content, which enhances discoverability and the viewer experience.
Details Checklist
The Details Checklist is a progress tracker located at the top of the playlist details page that helps you ensure all necessary information is complete before publishing. This visual checklist makes it easy to see at a glance what's been completed and what still needs attention, helping you confirm you have everything needed before making your playlist available to viewers.

Checklist Items
Basic Info - Title, Description, and Publish Date
Tags - Content categorization and organization tags
Advanced Fields - Additional metadata and custom parameters
Thumbnails - Image keys for visual representation across platforms
Trailer - Optional trailer or preview content
Status Indicators
Each checklist item displays an icon indicating its completion status:
White Exclamation Point - Optional field that is incomplete
Orange Exclamation Point - Suggested field that is incomplete (recommended but not required)
Red Exclamation Point - Required field that is incomplete (must be completed to publish)
Green Checkmark - Field has been completed
The checklist updates automatically as you complete each section, providing immediate visual feedback on your progress.
Creating a Playlist
Manual Playlists
Click the "Add Media" button to search and select content for your playlist.
NOTE: The button label changes depending if the Preset uses "Media", "Playlists" or "Mixed"
Arrange content in your desired order by dragging items using the dots on the left side.
Remove media by pressing the "Trash" icon next to the asset you wish to remove.
Dynamic Playlists
Under "Filter by Tags," configure the "Include" filters to specify which tags the piece of media must have.
Configure "Exclude" filters to specify which tags will disqualify content from appearing in the playlist.
Set sorting parameters to determine how content will be ordered (e.g., by publish date).
IMPORTANT: For the "Include" and "Exclude" filters, ensure the proper "Any" or "All" option is selected for accurate filtering.
Any- Only one of the selected tags needs to be present on the piece of content for the filter to apply
All- All tags must be present on the piece of content for the filter to apply
Managing Tags
Tags are organizational markers that help categorize and direct content throughout Backstage. The tagging system offers flexible input methods and management tools to streamline your workflow when organizing playlists and their content.
Adding Tags
Tags can be added to playlists and video assets using two methods:
Individual Tag Entry:
Type a tag name in the Tags field and press Enter or click the "+" button to add it to the playlist
This method works well when adding a small number of tags one at a time
Comma-Separated Value (CSV) Entry:
Type multiple tags separated by commas in the Tags field
Press Enter or click the "+" button to add all tags simultaneously
Example: "test, test 1, test 2" will create three individual tags: "test", "test 1", and "test 2"
This method is efficient when applying multiple tags to a single playlist
Copying Tags
The Copy Tags feature allows you to quickly duplicate tag configurations from one playlist to another, ensuring consistency across similar content.
How to Copy Tags:
Navigate to the playlist that has the tags you want to copy
Locate the Tags section in the playlist details
Click the "Copy Tags" button
All tags from the current playlist will be copied to your clipboard
Navigate to the destination playlist where you want to apply these tags
Paste the tags into the Tags field using your keyboard (Ctrl+V or Cmd+V)
Press Enter or click the "+" button to apply all copied tags
NOTE: When pasting copied tags, the system will automatically parse them as individual tags, maintaining the exact tag names from the source playlist.
Bulk Edit
The Bulk Edit feature enables efficient management of multiple playlists simultaneously, allowing you to update tags or delete up to 100 playlists at once. This powerful tool streamlines workflow when you need to make consistent changes across multiple pieces of content.
IMPORTANT: Once a bulk edit operation begins, it cannot be stopped and must complete before you can make changes to any other playlist metadata. Monitor the progress bar at the top of the page to track the operation status.
How to Use Bulk Edit
Selecting Playlists for Bulk Edit:
Navigate to the "Playlists" section on your left sidebar.
Click the checkbox next to each playlist you want to include in the bulk edit operation. You can select up to 100 playlists at once.
Once you've selected at least one playlist, the "MANAGE TAGS" button will appear at the top of the page alongside a "DELETE SELECTED" option.
Managing Tags in Bulk:
After selecting your desired playlists, click the "MANAGE TAGS" button.
The Add/Remove Tags modal will appear, displaying two filter options:
All: Shows all tags currently applied to any of the selected playlists
Shared: Shows only tags that are common across all selected playlists
To add tags:
Use the search field at the bottom of the modal to find an existing tag, or type a new tag name
Click the "ADD" button to move the tag to the "Adding" column under the "Changes" section
Repeat for any additional tags you want to apply
To remove tags:
Click the "X" next to any tag displayed in the modal
The tag will move to the "Removing" column under the "Changes" section
Tags removed will be deleted from all selected playlists that currently have them
Review your changes in the "Changes" section, which displays:
Adding: Tags that will be applied to all selected playlists
Removing: Tags that will be removed from all selected playlists
Click "APPLY" to execute the bulk edit operation, or "CANCEL" to discard your changes.
Deleting Assets in Bulk:
After selecting your desired assets, click the "DELETE SELECTED" button.
Confirm the deletion when prompted.
All selected assets will be permanently removed from the system.
Bulk Edit Status Messages
The system provides real-time feedback on your bulk edit operations through a banner at the top of the page:
Bulk Edit in Progress (Blue): The operation is currently running. A loading indicator will display alongside this message.
Bulk Edit Completed (Green): The operation finished successfully and all changes have been applied.
Bulk Edit Failed (Red): The operation encountered an error and was unable to complete. Contact support if this issue persists.
NOTE: During bulk edit operations, you will not be able to edit individual playlists or start another bulk edit. Wait for the current operation to complete before making additional changes to your video library.
Adding Content to Playlist
Manual Playlist
Navigate to the "Playlist" tab on the left side of the screen.
Search for your playlist by name in the search bar and click on it to open.
Click the "Add Mixed" button on the upper right side of your screen.
NOTE: The button label changes depending if the Preset uses "Media", "Playlists" or "Mixed"
If using "Mixed" media, use the Playlists/Videos filter in the top right corner to filter the below list
Search for the content you want to add. Backstage will allow you to click the asset and it will be highlighted with a checkbox when selected.
Click the "Add" button at the bottom right of your screen to add the selected content to your playlist.

Once added, you can position the asset in whatever order you prefer by hovering your mouse over the dots on the left side of the asset and dragging it up or down in the list.
To remove content from a playlist, click the trash icon to the right of the asset.
Click "Publish" to apply your changes. The Publish button will both save and publish your updates. If the playlist is active on the homepage, your changes will appear immediately.
Dynamic Playlist
Navigate to your dynamic playlist and locate the "Filter by Tags" section
Configure your Include filters:
Select the tags or custom parameters that content must have
Choose "Any" if content needs just one of the selected criteria
Choose "All" if content must have every selected criteria
Configure your Exclude filters to prevent unwanted content from appearing
Set your sorting parameters to control the order content appears (e.g., by publish date, alphabetical)
Dynamic Playlist Examples
Example 1: Network Content with Premium Exclusion
Include Tag - Any:
A,BExclude Tag - All:
premiumResult: Shows any content tagged with
AorB, but excludes any content marked as premium


Example 2: Christmas Special Collection
Include Tag - All:
Christmas,Special,2026Exclude Tag - All:
inActiveResult: Shows only content that has all three tags (
ChristmasANDSpecialAND2026), while excluding any content marked asinActive


NOTE: Remember that for Include and Exclude filters, ensure the proper "Any" or "All" option is selected for accurate filtering results.
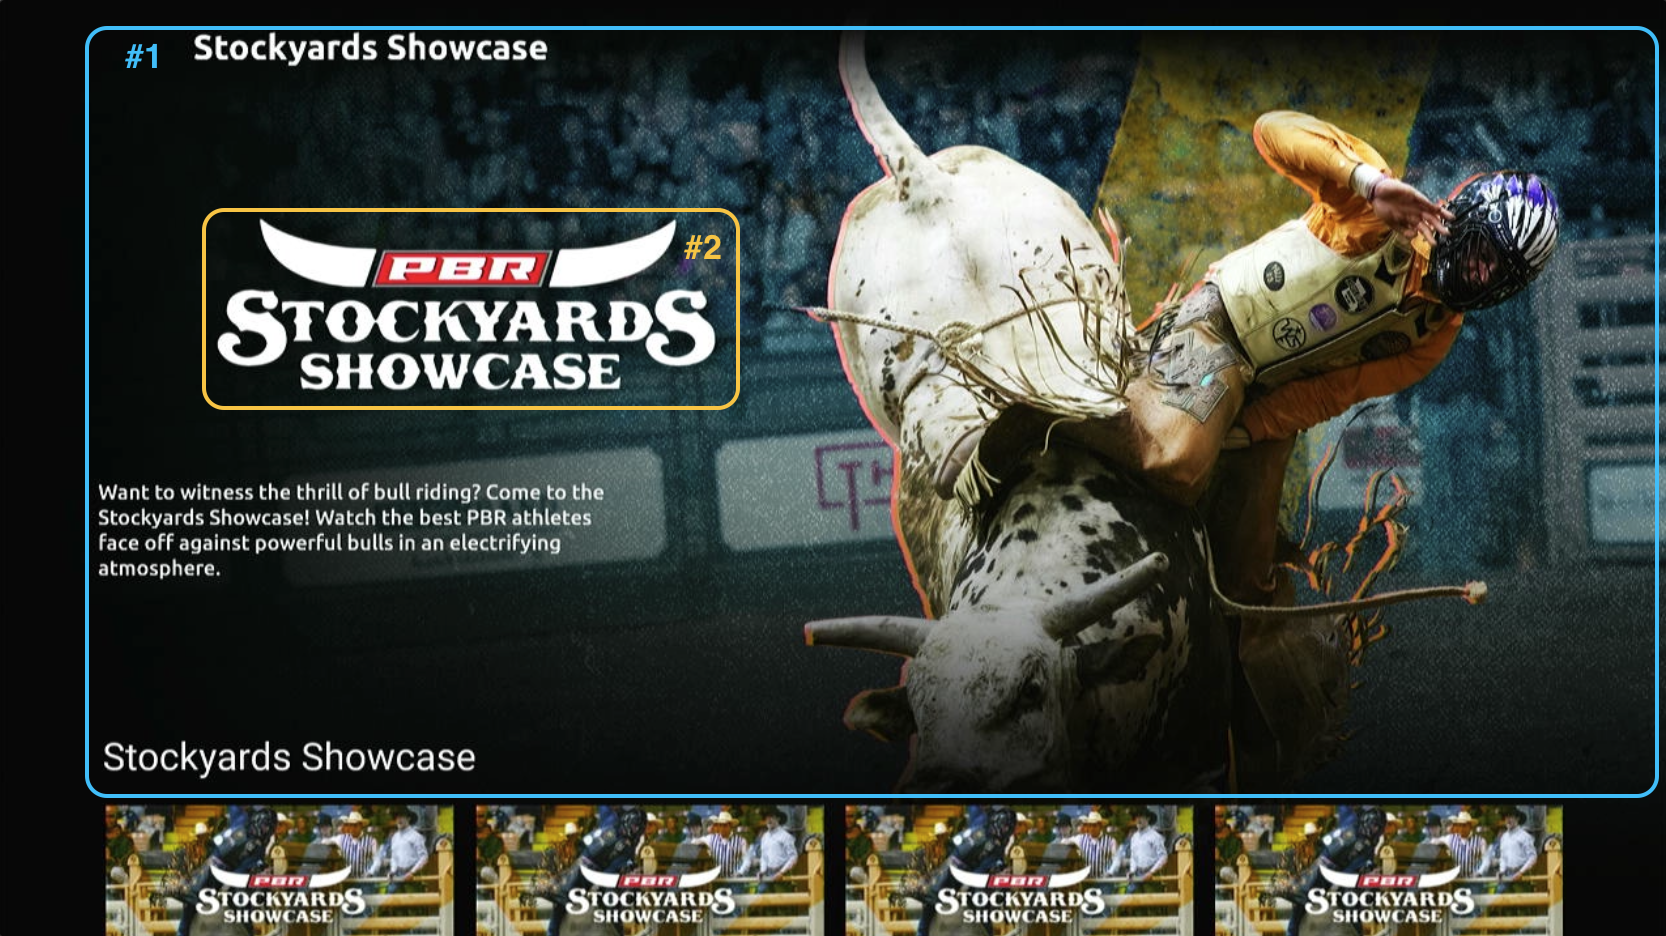
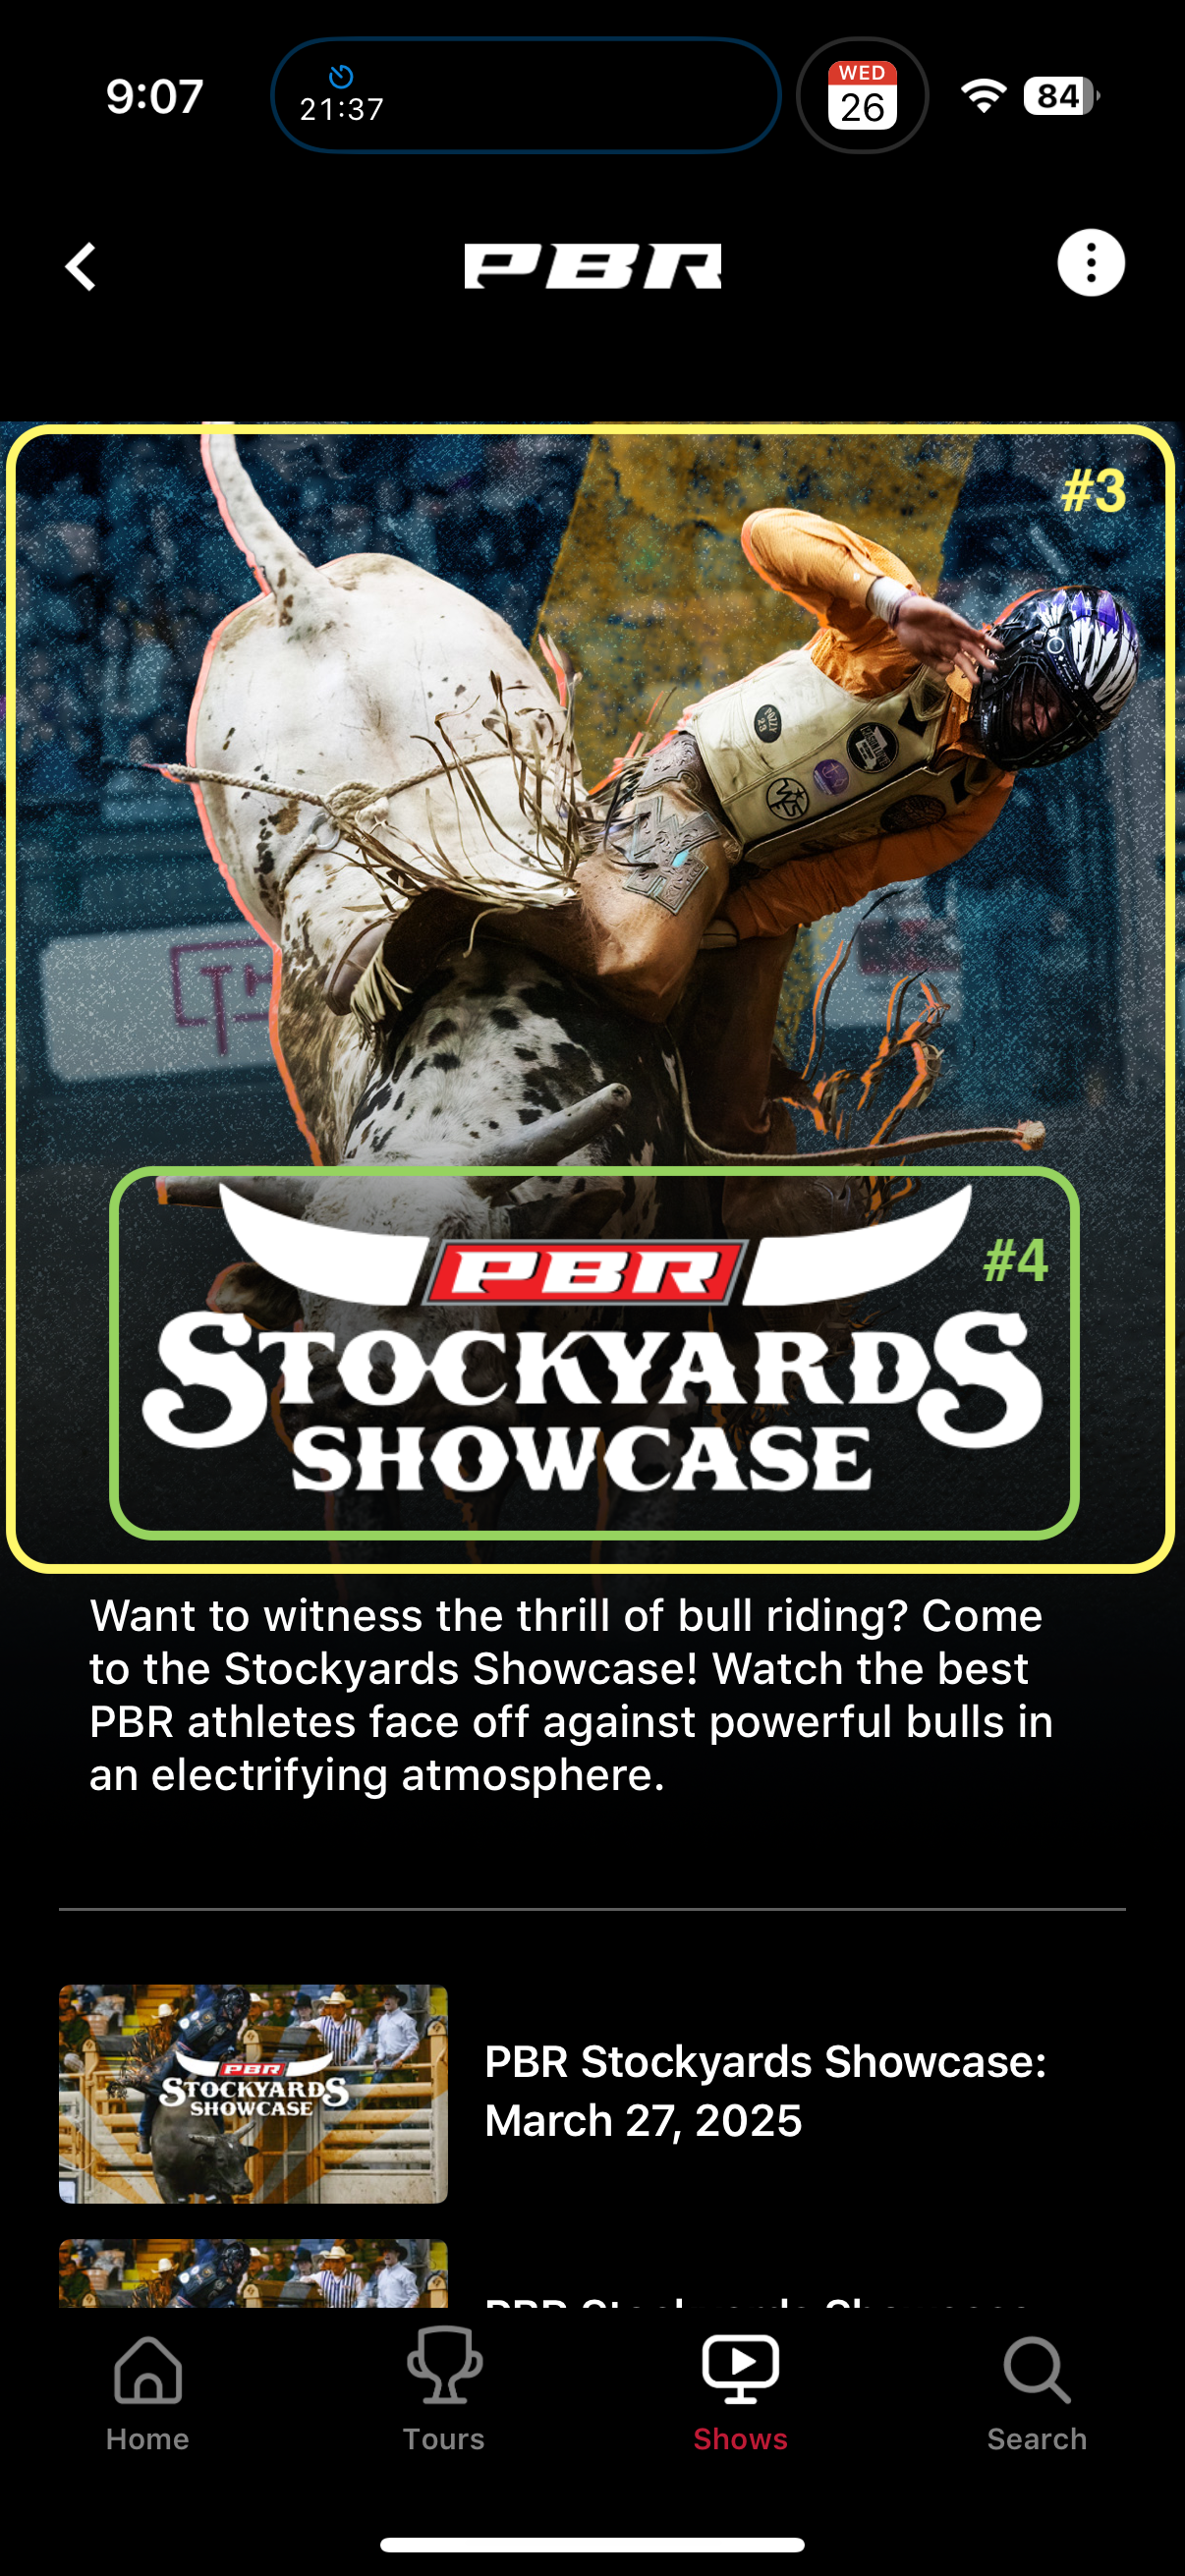
Image Keys Matrix
Playlist images are used to create landing pages by combining multiple image assets into a complete hero display. All specified image keys must be implemented to ensure proper visual presentation across platforms. When developing new show landing pages, verify display quality across mobile, tablet, web, and TV platforms.
Please refer to the screenshots below, which outline the necessary image keys for new shows:
#1
imgSeriesDesktopBg
1920x1080
Web, CTV, Roku
#2
imgSeriesLogo
1161x400
Web, CTV, Roku
#3
imgSeriesMobileBg
1242x1491
Mobile
#4
imgSeriesLogoMobile
1161x400
Mobile
IMPORTANT: The dimensions and naming conventions are critical for proper display across all platforms. Always use the correct size and key for each image type.
Last updated